As Christmas inches closer, you will enjoy the Countdown to Christmas Advent Calendar Kit Class by Stampin’ Up! to keep track of what day it is and watch as the little ones discover some fun gifts or treats.
Join me using Zoom on Monday, November 30th at 6:30 PM MST. Order your Kit by Friday, November 20, 2020.
These are just a few of the fun ways to fill your countdown boxes:
Elf on the Shelf Clues
Random Acts of Kindness for 25 days
Daily scripture
Treats
Toys/Trinkets
Let the countdown to Christmas begin! It’s perfect for children, grandchildren and a great family tradition to celebrate the festive season in your home! Available to ANYONE in the United States!
As a result of not being able to meet in person, for now we are meeting online thru Zoom for all of us to have some fun while we are social distancing!
Kit includes: Enough supplies to decorate 25 mini boxes and an outer box Outer box: 11-3/16″ x 11-3/16″ x 2-3/16″ (28.4 x 28.4 x 5.6 cm) Mini box: 2-1/8″ x 2-1/8″ x 2-1/16″ (5.4 x 5.4 x 5.2 cm)
Product colors: Cherry Cobbler, Early Espresso, gold foil, Mossy Meadow, white
Optional Add on to have a 2nd set of numbers to design back of boxes for any theme you want as well as cards, gift cards etc.
Optional Add On for Elf on The Shelf boxes, countdown to Santa etc.
Use Host Code to Get Extra “Perks” from me:
Use this host code below to place your online order if it is under $150, you will also get extra perks from me! If your order is over $150 DO NOT use the code – you will still get perks from me and you will get your own Stampin’ Rewards from Stampin’ Up! Just copy/paste this code: ZNVRQU26 when placing your order.
Shop with a discount! Get the Starter Kit and join the Crafts a Latte stamping family
DISCLOSURE- The contents of this blog are the sole property of Terri Brumagim, Independent Stampin’ Up! Demonstrator and is not endorsed by Stampin’ Up!®
The photos, ideas, tutorials, projects are for your personal use only and may not be reproduced for websites, competitions or publications without the express permission of the author.
Thank you for joining us for Kylie & Bruno Bertucci’s Stampin’ Up!® Demonstrator Training Program Thank You Card Blog Hop! You are currently visiting Terri Brumagim with Crafts A Latte and I am in the United States. We are so happy that you could join us today for this blog hop for ideas and creative inspiration. This year, this Blog Hop is going to focus on Thank you cards that we are sending to our customers.
We are a group of Stampin’ Up!® Demonstrators from around the world that are taking part in training that is helping us to build a successful Stampin’ Up!® business and reach some goals we have set. We really appreciate your support.
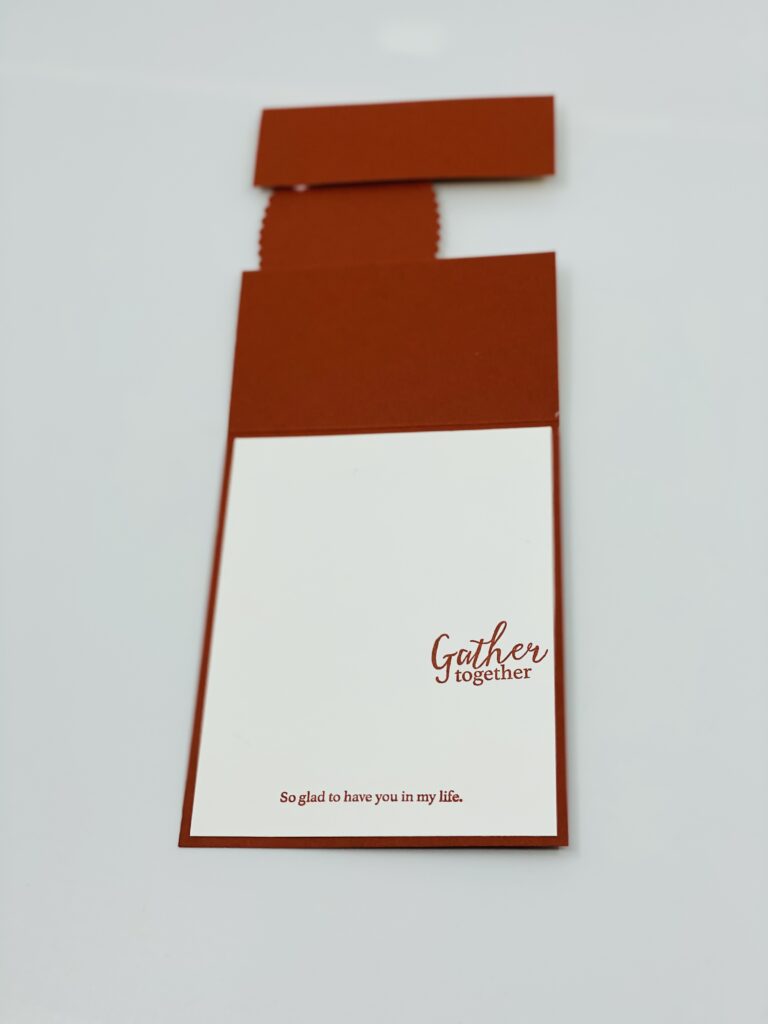
Here is my Thank You Card for this month. I think it so important to acknowledge my customers, family and friends whenever possible. I hope you are able to be inspired and make and share your thank you cards as well.
Gather Together Bundle used as well as Peaceful Moments for the Thank You
To get the best value out of your gold foil, use the inside to cut out images before adhering your layers together.
You can always leave the inside blank, in case you want to forward the card to someone.
For detailed instructions on how to make this thank you card, simply click here.
I used the Gather Together Bundle that can be found in my Online Store HERE.
HOP ALONG:
Thank you so much for checking out our hop today! We know you are going to love all the other projects you will see in the hop today so don’t forget to hop all the way around. You are currently at my blog – Terri Brumagim. Check out the list below to make sure you see who is next. Please click on the names below to continue on the hop.
BLOG HOP LIST
Use Host Code to Get Extra “Perks” from me:
Use this host code below to place your online order if it is under $150, you will also get extra perks from me! If your order is over $150 DO NOT use the code – you will still get perks from me and you will get your own Stampin’ Rewards from Stampin’ Up! Just copy/paste this code: 2RTUEXPU when placing your order.
Thank you so much for subscribing and supporting my Craft A Latte business. I am so grateful to ALL of you for letting me be your Stampin’ Up Demonstrator! Please be sure to click here Crafts A Latte Loyalty “Perks” Rewards to be rewarded for shopping with me.
Blessings,
Terri Brumagim c/o Crafts A Latte
DISCLOSURE- The contents of this blog are the sole property of Terri Brumagim, Independent Stampin’ Up! Demonstrator and is not endorsed by Stampin’ Up!®
The photos, ideas, tutorials, projects are for your personal use only and may not be reproduced for websites, competitions or publications without the express permission of the author.
How can you not like these cute little Gnomes? The Gnome For The Holidays Fall Open Front Panel Card will surely make someone’s day. The fun thing about making the Gnome out of punches is that I be will changing it up every month for the holidays. In addition, you could punch out the tree and reverse it to easily change up the colors for a Christmas look.
Punches
First, let’s build our Gnome using punches. Below is a picture of what you will need to build this cute little Gnome. Perennial Flower Punch and Pine Tree Punch can be used for many different projects. If you do not have the Sunflower Dies, use whatever circle product you have. For instance, you could use the 1-1/2″ circle punch.
Third, below are the written directions to make this fun Gnome For The Holidays Plaid Open Front Panel Card.
Supplies:
Stamp Sets – Gather Together Photopolymer Stamp Set (150589)
Cardstock – Plaid Tidings 6″x6″ Designer Series Paper (153527); Cajun Craze (119684); Bumblebee (153077); Petal Pink (146985); Basic Black (121045)
Stamp Pads – Cajun Craze (147085)
Misc. – Pine Tree Punch (149521); Perennial Flower Punch (149522); Sunflowers Dies (152704); Layering Ovals Dies (141706); Bumblebee 2020-2022 In Color Ribbon (153622); Stampin’ Dimensionals (104430); Multipurpose Liquid Glue (110755); Bone Folder (102300); Paper Trimmer (152392); Stampin’ Cut & Emboss Machine (149653).
You could easily change any stamp set for this playful card. Gnome For The Holidays is perfect for switching up the Gnome for any holiday.
Measurements:
Cajun Craze: 4-1/4″ x 8″, score on long side at 5-1/2″. Cut bottom piece at 1-1/2″ x 4-1/4″, scrap for (largest) Scalloped Layering Oval Die.
Bumblebee: 4″ x 2-1/4″ & 4″ x 1-1/4″, scrap for (2nd largest) Layering Oval Die.
Plaid Tidings DSP (Designer Series Paper): 3-3/4″ x 2 & 3-3/4″ x 1″, scrap for hat of Gnome.
Whisper White : 4″ x 5-1/4″ (inside), scrap for face of Gnome.
Basic Black CS: Scrap for Gnome feet
Petal Pink CS: Scrap for nose
Instructions:
Score Cajun Craze “Base” 5 1/2″. Burnish (crease) with bone folder.
Let’s build our layers:
Top layering: Adhere 3 3/4″ x 2 Plaid Tidings DSP to the Bumblebee 4″ x 2 1/4″, wrap the Bumblebee Ribbon around these 2 layers. Adhere to top base.
Bottom layering: Adhere the 3 3/4″ x 1″ Plaid Tidings DSP to the Bumblebee 4″ x 1 1/4″.
Create piece to “attach” the top and bottom. I used Bumblebee CS to die cut with the (2nd largest) Layering Oval Die . 2nd layer is Cajun Craze die cut from the (largest) Scalloped Layering Oval Die. Adhere together.
Making Gnome:
Use the Pine Tree Punch & the Plaid Tidings DSP to punch tree for hat. Use Petal Pink CS to punch out just the base of the tree. This will be the nose. Use the Perennial Flower Punch for the black feet . To make the beard, you will need a Whisper White scrap. Using the smallest sunflower, run through the Stampin’ Cut & Emboss Machine. Adhere together.
Adhere dimensionals only to very top and very bottom. This is how you are connecting top and bottom together.
Line up bottom layer to base, align Gnome to left bottom and the top flap and adhere with dimensionals.
Line up the Whisper White CS 4″ x 5 1/4″piece to “inside”, but do not glue down until you stamp your greeting. Use the Gnome as your guide to see where to stamp, once you have stamped your sentiment to the right of the Whisper White with Cajun Craze, lift up Gnome & stamp 2nd sentiment with Cajun Craze. The saying will be underneath your bottom flap and will be visible when you open card. You are now ready to adhere your Whisper White CS to inside of card.
Use Host Code to Get Extra “Perks” from me:
Use this host code below to place your online order if it is under $150, you will also get extra perks from me! If your order is over $150 DO NOT use the code – you will still get perks from me and you will get your own Stampin’ Rewards from Stampin’ Up! Just copy/paste this code: ZNVRQU26 when placing your order.
Thanks for stopping by and taking time out of your day to visit my blog! And as always – your comments and orders are always appreciated!
DISCLOSURE- The contents of this blog are the sole property of Terri Brumagim, Independent Stampin’ Up! Demonstrator and is not endorsed by Stampin’ Up!®
The photos, ideas, tutorials, projects are for your personal use only and may not be reproduced for websites, competitions or publications without the express permission of the author.
Shop with a discount! Get the Starter Kit and join the Crafts a Latte stamping family
DISCLOSURE- The contents of this blog are the sole property of Terri Brumagim, Independent Stampin’ Up! Demonstrator and is not endorsed by Stampin’ Up!®
The photos, ideas, tutorials, projects are for your personal use only and may not be reproduced for websites, competitions or publications without the express permission of the author.
I’m so happy you’re here! My name is Terri, owner of Crafts a Latte. Sharing projects with friends and crafting together fills my cup.We make greeting cards, scrapbook pages, home decor, and 3D projects.
I’m passionate about sharing the joy of stamping and card-making with others. Whether you’re completely new to crafting or a seasoned pro, I’m here to make creativity easy, fun, and something anyone can enjoy.
I offer online card classes you can join from anywhere, with in-person events in Loveland, CO. I focus on helping you create quick and easy cards using cardstock, ink, ribbon, and embellishments. I aim to show you how simple and fun it can be to make something beautiful, even if you’re short on time or supplies.
Feel free to browse my website for inspiration, tutorials, and all the amazing Stampin’ Up! products that make card-making a breeze.
Hope you can join us virtually or in person for some paper crafting fun.
Three reasons why making cards makes me smile 😊
1️⃣ I love seeing the smile on someone’s face after I’ve given them a handmade card.🥰
2️⃣ It’s fun being creative and helps me unwind after a stressful day.✂️
3️⃣ The amazing people I’ve met who also enjoy paper crafting. ❤️
Subscribe to My Blog
Get My Free Newsletter!
Archives
Disclaimer
The content in this blog is the sole responsibility of Terri Brumagim as a Stampin' Up!® Independent Demonstrator. The use of and content of classes, services or products offered is not endorsed by Stampin' Up!